Most people nowadays choose to install integrated ceilings in their kitchens and bathrooms. The main reason is that it has a variety of functions such as flexible layout, convenient maintenance, heating, and ventilation. It is now the mainstream choice for kitchen and bathroom ceilings. The installation of integrated ceilings is relatively simple, as long as we spend little thought and effort, not professionals can also install their own. Here's how to install the integrated ceiling with Xiao Bian. You can easily handle it in four steps.
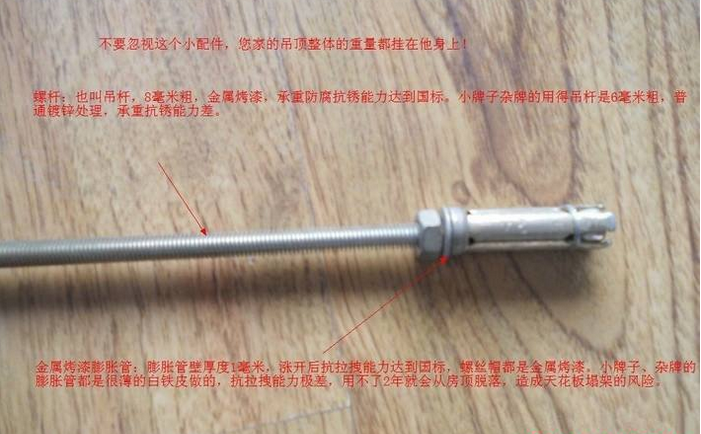
How to install an integrated ceiling : Installation of six screws
1. According to a good measure of size, screw the expansion tube screw into the ceiling, pay attention to the sandwich height between the ceiling and the roof, not less than 25cm, the screw must be installed perpendicular to the ceiling, and to be fixed, between the 6 screws Keep parallel.
2. Take an average of six points on the ceiling with a hammer to drill holes (do not affect the installation of electrical appliances). Measure the distance from the top line to the corner line, cut the screw with the actual distance of 8-10cm, screw one nut on one side and screw the expansion screw (the screw exposed about 3mm), screw the nut on the other side, put on The main keel is suspended and screwed into a nut.
3. Knock the expansion screw and screw into the hole, connect the big ceiling with the screw with 6mm diameter, screw the nut into the screw, then insert the big hanging piece, screw in the nut, and so on. 6 screws are installed.
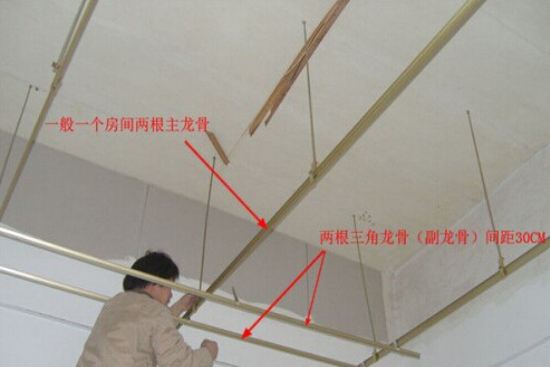
How to install the integrated ceiling II: keel installation
1. Test the size of the big hanging pieces, and clamp the main keel on the hanging pieces, cut the required size, and pay attention to keep the main keel parallel.
2. Put the triangle hanging piece into the triangular keel, and then fix it on the main keel. Before fixing the triangular keel, adjust the distance between each keel to 300mm. The air outlet ducts of the range hoods are arranged in front of the gussets and are not required if the range hoods are not installed.
3. The specific method is to subtract 5mm from the installation length and then cut the required triangular keel. After the triangle hanging piece is inserted into the triangular keel, the triangular hanging piece will be stuck on the main keel. Pay attention to the same card with the triangular keel hanging on the main keel. The card will not be reversed.
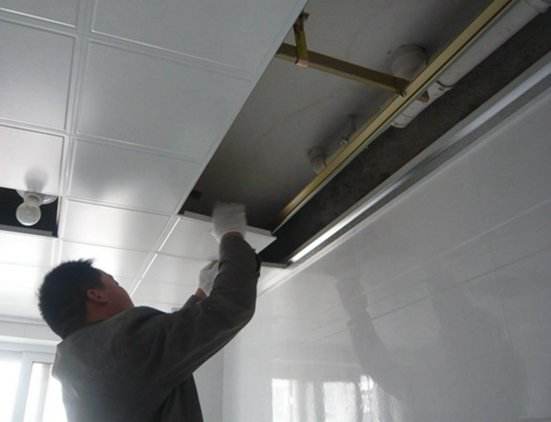
How to install the integrated ceiling three: installation plate
1. First insert the connector into the fixed triangular keel and cut the required length to insert the other end of the connector.
2. When installing the gusset plate, lift the membrane on the four sides of the gusset plate and install it in the same direction as the arrow on the membrane. The first row of gussets is generally installed with a utility knife for cutting. Attention should be paid to appearance and symmetry, and the cutting edge should face the wall.
3. The cut gusset plate is stuck in the triangular keel, and the notch surface is placed on the rim strip and the card angle of the hem strip is pulled to clamp the gusset plate. As an example, the first row of gusset plates is installed.
4. Control the gap between the first row of pinch plates so that the pinch plate spacing is 0, the four corners are in a “10†shape, and the pinch plate surface height must be the same. The installation quality of the first version of the gusset plate directly determines the installation quality of the rear gusset plate.

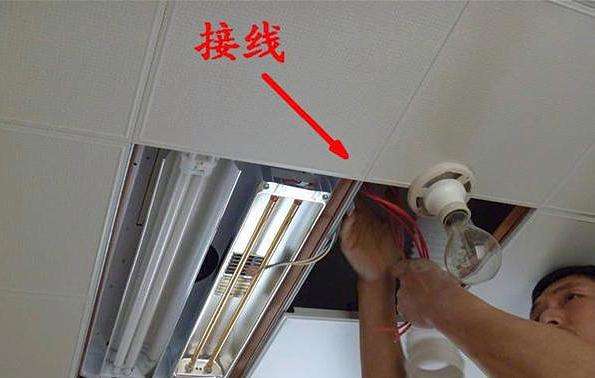
How to install ceiling installation four: install electrical appliances
1. Insert one side of the snap spring into the round hole on the mounting clip spring of the box, and insert the machine screw into the round hole on the electrical box and lock it. The box body with the snap spring installed is placed on the keel. The open slots of the four snap springs are pressed in turn against the triangular keel, and the electrical box body is firmly locked on the triangular keel.
2. Next open the junction box and connect it according to the corresponding function according to the wiring label, and then install the switch to test whether it is energized or not. After the power is turned on, close the junction box.
3. Finally, the overall check is to see if the gussets are flat and whether the electrical appliances can be used normally, so that the installation of the integrated ceiling is basically completed.
Editor's summary: The above is a four-step introduction to how to integrate the ceiling . If you do these constructions, you will be able to install the kitchen ceiling. If you want to know more related information, you can pay attention to this website information.
Integrated ceiling
Designed for easy maintenance and reliable performance for excellent uptime, the Hammerhead Tower Crane series provides excellent maneuverability and load moment precision. Equipped with a comfortable ergonomic cab, high-performance load diagram, and built-in safety features, the reputable time-proven design quality and components are engineered to deliver safe, reliable, cost-effective performance for long working hours.
Hammerhead Tower Crane
Hammerhead Tower Crane,Cmax Tower Crane,Tower Crane Pins,Stationary Tower Crane
Jinan Shanghangda Machinery Co., Ltd. , https://www.shdtowercrane.com