Floor heating has become a popular choice among homeowners due to its convenience and comfort. Integrating it during the renovation process can prevent many future issues. However, while selecting quality materials is important, proper installation is equally crucial. To ensure a successful floor heating system, the following guidelines and standards for installation are essential:
**First, Preparations – Conditions for Floor Heating Construction**
1. Ensure that all design drawings and technical documents are complete and have been reviewed.
2. The approved construction plan or organization design must be technically discussed and approved.
3. Qualified construction personnel and agencies should be in place to guarantee the quality of work.
4. Prepare the construction site: walls should be plastered, floors screeded, and temporary facilities like water, electricity, and material storage areas should be ready.
5. Verify that pipes, fittings, and supporting materials meet the design requirements.
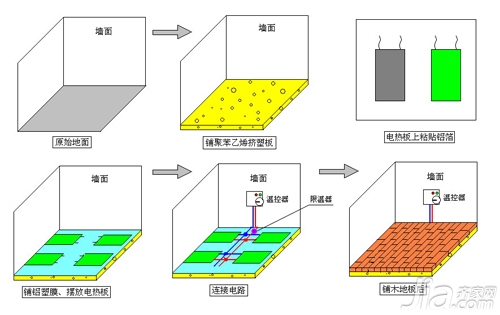
**Second, Floor Heating Construction Procedures and Technical Requirements**
1. Lay insulation material on a leveled surface, ensuring smooth and tight coverage. Only plastic staples passing through the heating pipe are allowed.
2. Install a polyester film or reinforced aluminum foil reflective layer as needed.
3. Laying the heating tubes:
- Follow the design layout, avoiding unnecessary joints in the filling layer.
- Maintain a bending radius of at least 8 times the pipe's outer diameter.
- Fix the heating pipe using three methods. Straight pipes should be fixed every 700mm, and bent pipes every 350mm. At 180° turns, use five clamps.
4. Install the heat medium collection device (water separator) either on the wall or in a special box. Ensure spacing between the water separator and collector is 200mm, and the collector should be at least 500mm above the ground.
5. Connect the heating pipes to the distribution device using dedicated clamps or card sleeves. Provide insulation sleeves at the end of each pipe to prevent overheating.
6. After connecting the pipes and the assembly device, flush each line until the water is clean.
7. Coordinate with the construction unit for the filling layer, maintaining a pressure of at least 0.6MPa. Pay attention to expansion joints and avoid damaging the heating pipes during concrete pouring.
**Third, Acceptance of the Heating Construction Project**
The acceptance process includes both mid-term and final inspections. Mid-term acceptance is conducted by the construction unit and the supervision team, while the final inspection involves the construction authority, designers, supervisors, and other relevant parties.
**A. Mid-Term Acceptance**
- Start after the heating pipes and heat collection device are installed and pressure tested.
- Self-test the pressure at 0.8MPa after installation.
- Conduct the mid-term test at a pressure of no less than 0.3MPa, but not below 0.6MPa.
- In winter, take antifreeze measures or conduct an air pressure test with approval from the construction and supervision units.
**B. Final Acceptance**
- Ensure all necessary documents are available: construction drawings, as-built drawings, design changes, material certificates, mid-term acceptance records, and project evaluation reports.
- Inspect the system during a 24-hour warm-up period. Gradually increase the temperature from 25°C–30°C over 24 hours, then raise it by 5°C every 24 hours until reaching the design temperature.
- Document and sign off on all tests and acceptances.
**Editor’s Note: Floor heating installations are complex and prone to errors. It’s essential to choose a trusted service provider.**
Since the system is hidden beneath the floor, any issues or maintenance needs can be difficult and costly to address. Choosing a reliable company ensures long-term performance and peace of mind. Always consult with professionals, review contracts carefully, and supervise the installation to avoid future complications.
**Warming Construction Project Notes:**
Whether you choose a product or an installation company, follow these key principles to ensure quality:
1. **Choose a professional heating company.** A reliable company handles everything from design to after-sales support, ensuring the best results.
2. **Select experienced contractors.** Their expertise helps optimize the heating layout based on your home’s structure and layout.
3. **Opt for high-quality pipes.** Since floor heating is a hidden system, the quality of the pipes directly impacts the project’s success.
4. **Use good insulation materials.** Proper insulation improves energy efficiency and reduces long-term costs.
**Recommended Reading:**
- [Warm winter net warm installation live recording](#)
- [Warm floor laying process and acceptance criteria (water heating, floor heating)](#)
**Tags:** Decoration construction knowledge, warm water installation, room heating
Functional Additive For Concrete And Mortar
Many other additives used for concrete or mortar are included here, for example, powder deformer, expansion agent, Hydrophobic Agent. Depending on the requirement of conrete or mortar, different product grade and dosage can be selected to add.
deformer,expansion agent,hydrophobic agent,silane powder,stearate,CSA expansion agent,deforming agent
Shanghai Na Long Tech Co., Ltd , https://www.na-long.com